Controlling Unity Post Process Effects with Timeline
Over the summer I have been getting back into Unity development after being away from it for about 2 years or so. Since then a lot of new features have been added and I being someone who is a bit addicted to updates, patch notes, and changelogs I wanted to spend some time exploring a Timeline and Post-processing (v2).
An example project and all the code posted here is available on GitHub. Feel free to try it out yourself or create an issue if you run into any problems.
My current Unity project uses a fair amount of Post-processing and I wanted a way to smoothly transition between effects. Extending Timeline seemed to be a great way to to accomplish this and would also integrate into the existing workflow my designer and I use to build cutscenes and other visual effects.
Unity has a few of blog posts about extending timeline and I strongly suggest checking them out as I won’t be spending much time covering the anatomy of a timeline extension. I first got started with Creative Scripting for Timeline and most recently they have published Extending Timeline: A Practical Guide.
Before getting into the Timeline code it is worth covering how I am currently using post-processing. My solution is specific to my setup and does not support all the different ways post-processing can be used. But for simple projects like mine it works well.
How I use Post-processing
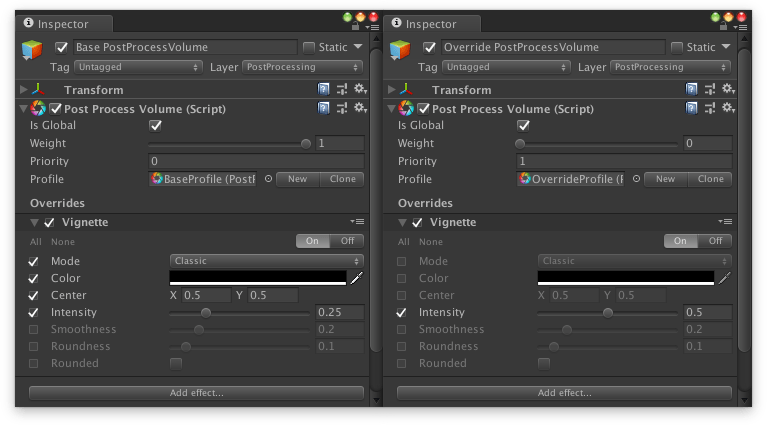
Every scene has a single global Post Process Volume and Post Process Profile which I will refer to as the Base Volume and Profile. The base profile then contains every effect that will ever be active in a scene. During a cutscene, a separate volume and profile is setup to override certain parameters of the base volume. I will refer to this volume and profile as the Override Volume and Profile.
Animating from Base to Override
When multiple global volumes are active in a scene the end result can be changed based on the volumes weight and priority. For example consider an animation where a Vignette effect is intensified. Setup a base volume to have a priority of 0 and a weight of 1. Create an override volume with a priority of 1 and a weight of 0. The override profile then has the vignette intensity parameter configured to how it should look at the end of the animation.

When the weight of the override volume is changed from 0 to 1 the vignette intensity will smoothly interpolate from the base profile parameter to the override profile parameter. Given a base profile with a vignette intensity of 0.25 and an override profile with a vignette intensity of 0.5, the final intensity will change from 0.25 -> 0.5 as the weight changes from 0 -> 1.
A limitation of this method is that only parameters that are enabled (have a ☑) in both the base profile and override profile will change. This is why the base profile must contain every effect and parameter that you want present at the end.
This limitation results in the code being very simple because Timeline is built around animating a weight value from 0 to 1. Instead of translating the weight of a playable into some unique animation logic we can just pass the weight directly to a post process volume.
Extending Timeline
If you are unfamiliar with the anatomy of Timeline I suggest you read Extending Timeline: A Practical Guide.
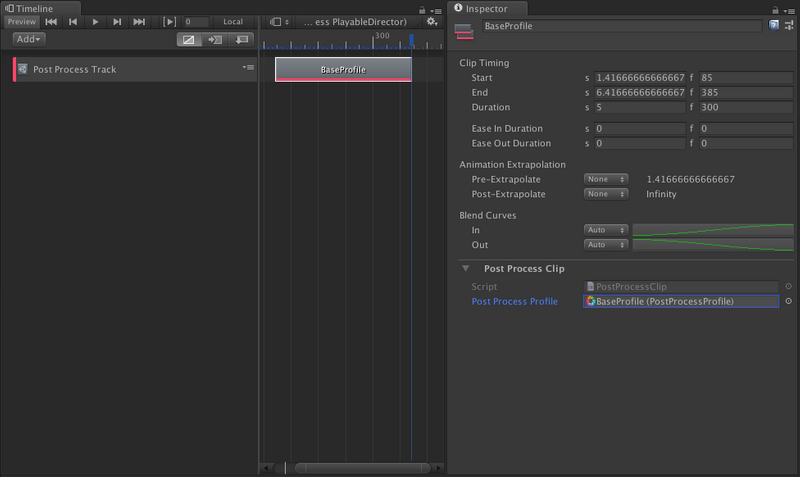
For my purposes I decided to associate a Post Process Profile asset with a clip instead of a Post Process Volume. Starting from the asset cuts out the need to first create and setup a volume. In my experience Unity tools become vastly simpler when they do not depend on a configured GameObject. The downside is that this means the playable behaviour is responsible for instantiating a PostProcessVolume and cleaning up after itself.
For now my project can afford on demand GameObject instantiations but it is important to keep in mind that this sort of instantiation is a bad practice and is terrible for performance.
PostProcessClip and PostProcessBehaviour
The PostProcessClip defines our data and will create the PostProcessBehaviour. When the clip creates the behaviour, it will instantiate a PostProcessVolume that is configured to use the Profile associated to the clip.
[Serializable]
public class PostProcessClip : PlayableAsset, ITimelineClipAsset
{
    [HideInInspector]
    public PostProcessBehaviour template = new PostProcessBehaviour();

    public PostProcessProfile postProcessProfile;

    public ClipCaps clipCaps
    {
        get { return ClipCaps.Extrapolation | ClipCaps.Blending; }
    }

    public override Playable CreatePlayable(PlayableGraph graph, GameObject owner)
    {
        var playable = ScriptPlayable<PostProcessBehaviour>.Create(graph, template);
        PostProcessBehaviour clone = playable.GetBehaviour();
        int layer = LayerMask.NameToLayer("PostProcess");
        if (postProcessProfile != null)
        {
            PostProcessVolume volume = PostProcessManager.instance.QuickVolume(
              layer,
              1,
              postProcessProfile.settings.ToArray()
            );

            volume.weight = 0;
            volume.priority = 1;
            volume.isGlobal = true;
            volume.profile = clone.postProcessProfile;
            clone.postProcessVolume = volume;
        }

        return playable;
    }
}
The QuickVolume method will instantiate a new GameObject and PostProcessingVolume that uses the Profile assigned to the clip. The volume is then configured with to be global with a priority of 1 and is then passed to the newly created PostProcessBehaviour.
QuickVolume creates a hidden object and for debugging purposes it can be helpful to have that object shown in the hierarchy:
PostProcessVolume volume = PostProcessManager.instance.QuickVolume(...);
volume.gameObject.hideFlags = HideFlags.DontSave | HideFlags.NotEditable;
volume.gameObject.name = $"PostProcessClip.CreatePlayable: Quick Volume [Profile {postProcessProfile.name}]";
...
This playable supports mixing and blending clips so the logic for changing volume weight will be inside PostProcessMixerBehaviour. The PostProcessBehaviour just needs to contain a reference to the volume it controls and logic for cleaning up the GameObject after the playable is no longer needed.
[Serializable]
public class PostProcessBehaviour : PlayableBehaviour
{
    public PostProcessVolume postProcessVolume;

    public override void OnPlayableDestroy(Playable playable)
    {
        if (postProcessVolume != null)
        {
            GameObject go = postProcessVolume.gameObject;
            RuntimeUtilities.DestroyVolume(postProcessVolume, false);
            RuntimeUtilities.Destroy(go);
        }
    }
}

PostProcessTrack
The PostProcessTrack just needs to create the PostProcessMixerBehaviour.
[TrackColor(0.98f, 0.27f, 0.42f)]
[TrackClipType(typeof(PostProcessClip))]
public class PostProcessTrack : TrackAsset
{
    public override Playable CreateTrackMixer(PlayableGraph graph, GameObject go, int inputCount)
    {
        var scriptPlayable = ScriptPlayable<PostProcessMixerBehaviour>.Create(graph, inputCount);
        return scriptPlayable;
    }
}
PostProcessMixerBehaviour
PostProcessMixerBehaviour has the method ProcessFrame which will set the volume weight depending on where we are in the timeline.
public override void ProcessFrame(Playable playable, FrameData info, object playerData)
{
    int inputCount = playable.GetInputCount();
    for (int i = 0; i < inputCount; i++)
    {
        ScriptPlayable<PostProcessBehaviour> playableInput = (ScriptPlayable<PostProcessBehaviour>)playable.GetInput(i);
        PostProcessBehaviour input = playableInput.GetBehaviour();

        float inputWeight = playable.GetInputWeight(i);
        input.postProcessVolume.weight = inputWeight;
   }
}
Currently playable.GetInputWeight(i) will return 0 for clips that are not being played and 1 for clips that are being played. Because the clip supports ClipCaps.Blending the clip Ease In Duration and Ease Out Duration can be set so that the weight will ease from 0 -> 1 over a specified time.
Wrapping Up
In all this is a pretty simple and easy to use way to control Post-processing effects with Timeline. It is pretty limited in that it only works with global volumes but for simple projects I think it works great and best of all it is a small amount of code.
After spending more time with it I have added the ability to set a custom AnimationCurve for controlling the weight instead of just using Ease In Duration and Ease Out Duration. Be sure to checkout the repo for all the code, updates I have made, and an example project!
